The Signing Process
Once the signer has validated their ID and consented to the Electronic Signature Disclosure, they will be taken into the first page of the document.
- The right side of the window has a document map showing the number of pages in the envelope and the pages that have tags. The signer can click on a page to jump to a page. They can hide or show the document map by click the Hide/Show control.
- There is also a control for zooming in or out on the current page. The signer can select the page size from the list.
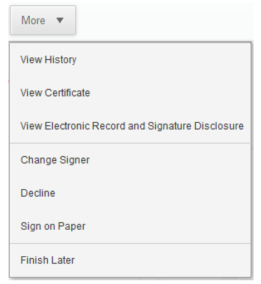
- In the center of the header the signer can download the document as a PDF file, print the document, and access the More menu. From the More menu, the signer can view information about the envelope, or select to change the signer, decline to sign, print and sign on paper and fax, or finish signing later. See the More Options topic for more information about the options presented.

The yellow indicator on the left side of the document page is used to guide the signer through the process of filling in and signing the document. The signer clicks Start to begin the signing process. The indicator changes to an arrow as the signer is taken to the first tag to fill out. The text shown in the indicator arrow is the action the signer is expected to take for the current information tag. The text in the arrow changes as the indicator guides the signer through the document. The images below are examples of possible indicator arrows and with the expected actions:
- CHOOSE: Select an item from a drop down list, a checkbox, or option button.
- FILL IN: Type information into the data field. Click Next (see below) or press the Tab key to go to the next information field.
- ATTACH: The sender is asking the signer to provide some supporting documentation. See Signer Attachments for information about submitting the documents.
- SIGN and INITIAL:: Click the Sign Here or Initial tab to place a signature or initial in the document. If this is the first signature or initial tab, the signer is asked to adopt a signature. See Adopting a Signature for more information.
- NEXT and NEXT PAGEAfter adding information to a tab, you can click Next to go to the next tab or , in some cases, Next Page to go to the next page in the envelope.
- CONFIRM SIGNING: After adding information to all the required tabs, the signer can review the document. When they are done reviewing the document, click Confirm Signing to complete signing the process.
Note: Note: Some fields, such as signing date fields, are automatically filled in based on information available to the system. The signer cannot change or modify this information.
As the arrow leads the signer through the document, they use the following guidelines for filling out information:
- To select an option button or checkbox, the signer clicks on the appropriate option button or checkbox. Note that the signer can only select one option button in a group.
- To select an option from a dropdown list, the signer clicks on the list and selects the appropriate option.
- To add other information in a boxed field, the signer types the requested information into the field and clicks Next or presses the Tab key to continue.
- To sign or initial a tag, the signer clicks the Sign Here or Initial tag. The first time a signer clicks a Sign Here or Initial tag, they are asked to adopt a signature and initials. See Adopting a Signature for more information.
When the signer has completed adding information to all the required tabs in the envelope, the indicator arrow change to a box that says Confirm Signing and a message box appears around the box.
Next Step(s):


